
Wondering how to start a t-shirt business with your custom designs? It’s easier than ever when you use the print-on-demand (POD) business model and create a website with WordPress.
Data from 2022 shows that WordPress is one of the best platforms on which to launch a company’s website. W3Tech reports that 43.2% of all websites run on the WordPress content management system. Then why not use it as the foundation for your brand-new company?
With the print-on-demand production method, your products will only be printed with your custom designs when customers place orders for them. Your POD provider, such as Printify, handles the printing, shipping, and delivery of orders placed in your online store. Because of this, buying a large inventory or managing it will not be needed.
As your POD provider takes this huge weight of business operations off of you, you can focus completely on designing unique products, for example, making your own t-shirts and growing your business. Appealing, right?
Get started with your store as we guide you step-by-step in starting your own POD business with WordPress. By the end of this article, you will be ready to start making money by selling custom products.
Start Creating Your WordPress Website
The first step in creating your WordPress-powered online store is creating your WordPress website. To create your own WordPress website, you will have to follow the steps given below:
Step 1: Choose the WordPress plan

There are significant variations in the plans in terms of monthly cost, degree of site personalization, and availability of promotional resources.
Step 2: Select your domain name and set up a hosting provider
A domain name, which can be thought of as the address of your website and often appears like this: www.xyz.com.
The hosting provider you choose will determine your website’s performance (i.e. the load time, security, and dependability of your website). Bluehost, WP Engine, and Kinsta are among the top web hosts for WordPress websites. Make sure that the possible WordPress hosting you choose satisfies the following requirements:
- A minimum of PHP 7.4
- Any database server supporting either MySQL 5.6 or MariaDB 10.1.
- Compatibility with HTTPS
Step 3: Install WordPress and connect it with the domain you’ve chosen
This step is only necessary when you choose to host providers outside WordPress.
Managed WordPress hosting solutions like WP Engine and Kinsta save you the trouble of installing WordPress. They were designed with WordPress in mind from the ground up and come pre-installed with WordPress.
Step 4: Add WooCommerce Plugin
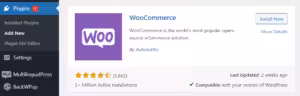
Navigate to the Plugins section of the WordPress dashboard’s left sidebar. Find WooCommerce by clicking Add New and searching for it. From the WordPress plugin directory, enable WooCommerce.
Step 5: Add details to WooCommerce
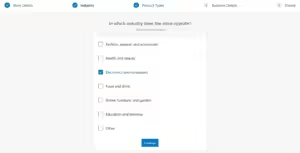
A notification will appear after the installation process is complete, and the Setup Wizard will start. If you seem to have missed this, the Setup Wizard may be accessed from the help section. When you reach there, fill up the form with information about your shop, your industry, the goods you intend to offer, and so on.
Step 6: Select your website’s theme
Once you’ve integrated your website with WooCommerce, your store is ready. There are a wide variety of themes and templates available for use with WordPress, each with its own set of”
- designs,
- layouts,
- formatting styles,
- color schemes,
- fonts,
- and other graphical customization possibilities.
WordPress will apply an automatic standard theme. You can choose other WordPress themes, both free and premium, and customize them to make your site more attractive to your target audience.
The “Personalize my store” section of the Setup Wizard makes it easy to upload a logo, customize the design of your homepage, and write a message that can be shown on each page of your web-based store.
Pick Your Print-on-Demand Platform and Provider
Several print-on-demand services are available for integration with WooCommerce Extensions. It’s important to partner with the right POD provider. The success of your business depends on it.
Here are a few things you need to consider when choosing a POD provider:
- The cost
- Size of catalog
- Product quality
- Customization options
- ETA for shipping
- Support
- Ease of integration
More than 850 premium white-label goods are available with Printify’s broad catalog. They can make everything, be it custom t-shirts, phone cases, stickers, footwear, etc. Here are some great benefits of choosing Printify:
- easy customization with the free mockup generator
- 10-day-promise of delivery
- best prices out there
- 24/7 support
- global print provider facility network
Once you’ve chosen a POD provider, it’s easy to set up a store.
Set Up Your Print-on-Demand Store – WordPress Edition
With Printify, all you have to do is connect it with WooCommerce. Follow the steps below to do so:
Step 1: Go to your website > admin panel > WooCommerce
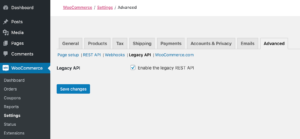
Step 2: Settings > Advanced Tab > Legacy API and check “Enable the legacy REST API.” Then save changes.
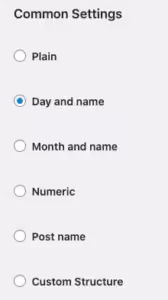
Step 3: Next, go to settings > permalinks. Choose any option in common settings apart from Plain.
Step 4: Log in to Printify > manage my store > connect. Add WooCommerce
Step 5: Add WordPress URL (found in Settings of WordPress Admin).
Step 6: Install the Printify for WooCommerce plugin to ensure that your Printify products automatically update and charge the correct shipping rate.
Design Your Products
Once your Printify and WooCommerce-powered WordPress store are connected, it’s time to let your creative bug out!
You can browse the vast catalog of different types of white-labeled products to add your designs and use their mockup generator to put your design on the products. Once ready, preview your custom hoodies or other products and save, and publish it on your WooCommerce store. Give each item unique names, search-engine-optimized descriptions, and high-quality images.
If you start with a small budget, you can create designs on your own using tools like Canva and Photoshop to make catchy designs. You can also use stock images! However, if you’ve got a budget to hire professionals, use freelance platforms like:
- Behance
- Upwork
- Fiver
- Dribble, etc.
With professionals working on your designs, you can solely focus on marketing and growing your business. That brings us to our last step!
Create a Marketing and Product Plan
You can have the most beautiful online store in the world, but if no one knows about it, it won’t matter how great it looks. Here are some tried-and-true techniques to include in your marketing plan to give your site an initial traffic boost:
Use Social Media
People’s interactions with brands are largely shaped by social media marketing campaigns. The use of social media in advertising may:
- greatly expand your reach and
- bring new customers into your shop.
HubSpot reports that social media marketing with platforms like Instagram, Facebook, Twitter, and YouTube yields the best return on investment (ROI).
You can get the most out of social media campaigns when you choose the right platform by learning more about your target audience and the platforms they use the most.
Build brand awareness by responding to up-and-coming media trends and establishing a strong presence in your retail profile.
Be search engine friendly
One of the most effective methods to drive visitors is through organic search, and successful search engine optimization (SEO) necessitates regularly updating a store’s content.
With interesting or useful content, you may attract customers even beyond your target audience. Adding a blog section to your WordPress site is a fantastic way to top the search engine result pages (SERP).
Use blogs to have in-depth conversations directly with the reader regarding your industry and products. It can also broaden your brand’s appeal by sharing breaking news and useful knowledge your customers may use before making a purchase.
Make your products stand out beyond the standard product descriptions by including a backstory to boost your brand’s credibility.
Harness the Power of Newsletters
Compared to social media updates, newsletters offer personalization and a direct means to contact your clients. They are an excellent means to share:
- promotions,
- events,
- and seasonal shop updates.
You can use emails to even notify customers about:
- personalized discounts on wishlist products,
- items in the cart,
- and interesting new content on the blog.
A smart idea is to also use affiliate marketing to increase revenue and create multiple income sources.
Conclusion
There you have it! A step-by-step guide to creating a POD website with WordPress. By using print-on-demand services, entrepreneurs with a creative side can surely profit from selling their artwork on a wide variety. You have many options to customize, such as:
- journals,
- t-shirts,
- stamps,
- phone covers,
- and so much more.
The great thing is that you don’t even need to make a large initial investment or deal with bulk shipping. We suggest you put this time and energy into creating a great storefront and then study your customers and curate a top-notch marketing plan to sell items that answer their needs.

Ready to Transform Your B2B Marketing Strategy?
Get a comprehensive SEO audit and discover how to drive more qualified leads to your business.
Get a Free SEO Audit